How to Make a String Stamp

A String Stamp
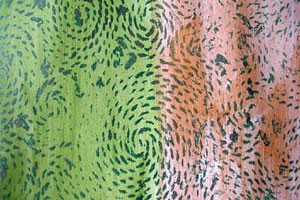
The sketch paper shown above was decorated using a stamp I made from string. The left side of the picture shows how I painted the sketch paper first and then stamped over it. On the right side, I stamped using acrylic paints and then washed over it with acrylic inks. I can’t remember where I read about this idea, but it’s very fun to do. Creating the string stamp pattern can be very relaxing, in a zen sort of way.Ingredients
- thick chip board ( I used the back of a notepad) or a piece of foam core for the stamp backing
- string (different sizes and types will create different effects
- double stick adhesive sheets; I use Therm-O-Web Peel n Stick sheets
- pencil or marker
- paints and paper or inks for when you’re ready to stamp
Process
1. Cut your chipboard into the size you want. This stamp was 4 1/2 X 5 1/2.
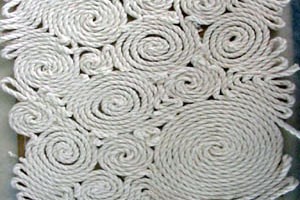
2. You can draw the design you want with pencil or marker on the chipboard or go at it with just an idea in your head as I did on this stamp. I knew I wanted spiraled designs, so I started in the middle and worked my way out to the edges.
3. Cut the double stick adhesive to the same size as your chipboard. Adhere it to the board.
4. Lay your string along the pencil designs you made on the chipboard, which you should be able to see below the adhesive. As you can see in the picture below, I filled in all the spaces on the board, but you don’t have to. You do want to try to keep the string as flat as possible on the board. I have some bunchy places where I was trying to double back in a tiny corner. I used a pair of tweezers to push the string down inside the nooks and crannies as much as possible. You’ll get a better impression that way.
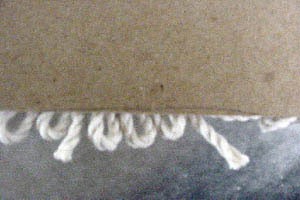
5. You can see in the next picture that I had the string overlap the ends of the board. When I was all done I turned the board upside down and trimmed the edges.
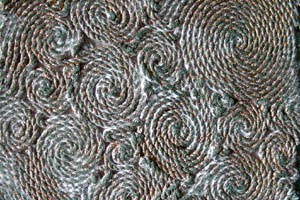
6. I used acrylic paints to make the paper shown above. I used a stiff brush to apply the paint to the stamp. I’m sure stamp pads and brayers would work as well, although I haven’t tried them yet. I would suggest not cleaning the stamp when you’re done. The acrylics will seal the string, making it sturdier. I don’t think the chipboard will hold up well to washing. I’m going to play around with this technique some more and will post the results of my experiments here. Play around with it and have fun!
If you like the idea of creating your own stamps, you might want to check out the book Stamp Stencil Paint: Making Extraordinary Patterned Projects by Hand by Anna Joyce who gives you lots of techniques for hand-printing a variety of surfaces.
