Altered Book Art ~ 18 Wishes

Altered Book Art ~ 18 Wishes
When my niece turned eighteen, I asked her what she wanted for her birthday. She said, “Make me a book.” Sounded good to me, so I asked her what colors and theme she was interested in. “Purples, silvers, and fairies,” was her reply. Now there’s a girl after my own heart! And so I jumped into making a piece of altered book art full of fairies for Danielle. Although Danielle has the book I created especially for her, I made another one, just a bit different. My process for creating this altered book art is described below.The Cover
The first thing I did for this altered book art was sand and gesso all the surfaces. Because I felt that the pages, despite being a board book, were a little on the flimsy side, I decided that the book would have only two double-page spreads, and I glued pages together to make them sturdier. I used Golden soft gel matte medium and fluid matte medium for all the gluing in this book.

The next step was to paint the cover. I pulled every shade of purple and silver paint that I had off the shelf. I used a damp sea sponge and went over every inch of the front and back, dabbing on paint and using my heat gun to dry it every time I switched to a new color. I worked from the darkest shade of purple to my lightest shade of silver. This part was so much fun because I didn’t have to worry about brush strokes or being careful. I had a carefree time painting the cover.
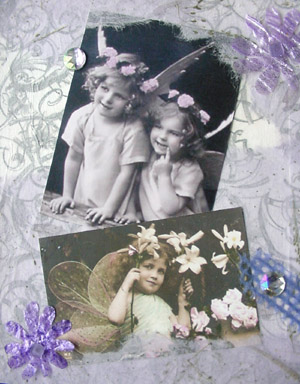
I printed out a fairy picture onto nice piece of matte paper and ran it through the Xyron. Then I wrapped it around a thin piece of cardboard to give it a three dimensional look. I glued a piece of silver card stock that I had trimmed with deckle scissors, onto the cover and then glued my fairy piece on top of that.
I used my Dremel with a tiny drill bit to make the wholes for the silver eyelets. This was a nerve wracking procedure because I didn’t want to destroy the picture by making a mistake drilling the holes. I was also worried about botching the whole eyelet smashing process. So I carefully measured and marked where I wanted the holes before doing any drilling. I wrapped silver wire through the holes and finished them off on the back side of the cover.
If I had been very clever, I would have done the drilling-eyelet-wire wrapping thing BEFORE I glued the book pages together. But that would have been too easy.
Underneath the picture, I used stick-on letters to write the title. Unfortunately, some of the letters didn’t stick so well, so I had to glue them down instead of relying on the original adhesive backing.
The First Page
Of course, when I turned to the next page of my altered book art, I found a bunch of ugly looking wire. I had to cover it up some way. I traced a piece of white card stock the same size as the book and glued it over the previously sanded and gessoed pages. A little pre-planning would definitely have made my life easier.

The pages of this altered book art are covered with all sorts of layers of paper. Layer one is torn lavender tissue paper. Layer two is white tissue paper which I printed with images of butterflies using my ink jet printer. I have an Epson C84 printer. The DuraBrite pigment inks allow me to apply medium on the tissue paper without it smearing.
I needed to soften up the look a bit, so my next layer was lavender Japanese rice paper. I stenciled some purple circles here and there too.
Finally I added the images of fairies that I had scanned from some old books, and the first spread was complete.


The Second Page
Since I wanted these altered book art pages to be consistent in their weight and appearance, I laid down another piece of white card stock on the second double page spread as well, but not before gluing a little Tyvec flap on the right page, since I knew that I was going to put a fold-out page of a fairy on that side. See, sometimes I do think ahead! Again, this page has lots of layers on it, starting with one of my favorite tissue papers with an ornate gray swirly pattern. On top of that I glued down handmade (not by me) purple paper with leaf inclusions. The little black shadow fairies around the page were ones I scanned and printed onto tissue paper. I also added purple lace paper, some purple flowers made with crystalline paper, and some little plastic gems I got from Goodwill.

The various fairy photos I got from Art-e-Zine, and they will probably be familiar to many of you. Gillian does photo swaps and then posts these great vintage images on her web site so you can download them and use them in your art. She also has lots of arty ideas for things to make with many talented guests offering directions and examples. Thanks, Gillian.
There’s one little touch on this page that I’m particularly happy with and that’s the little tulle skirt that I gave the fairy girl below. I cut a tiny piece of tulle and then sewed a little gather at the top. I cut under the girl’s arm and tucked and glued the tulle underneath.

Fold-Outs
In one of my old books I found a beautiful image of a fairy painted by Louis Rhead. I made a transparency of that image as well as a reverse copy on paper. I didn’t want the background behind the fairy to obscure her, so I cut and glued the fairy’s paper image behind the transparency so that she would be opaque. I made a little frame for her using card stock, stamps and stamping ink. The same decoration is on the backside of the frame as well. The background behind the fairy was painted and covered with tissue paper. I glued the whole sandwich together, tucking the little Tyvec flap between the layers, creating a fold-out page for my especially beautiful fairy.


Finishing Touches
The last part of creating my altered book art was to add the eighteen wishes that I wanted Danielle to have. I had originally thought about writing the wishes around the inside of the book. But in the end I put them on tags to dangle from assorted purple and silver fibers from the top of the spine.
First I measured the size of the round tags. (I lucked out and got a whole bunch of these metal rimmed tags for a buck from an office supply store that was going out of business.) Using my drawing software (AppleWorks, for all you Mac users), I made a faint gray circle the same width as the inside of the tag. Then I used different types of fonts and text colors to write my wishes for Dani ~ love, curiosity, patience, courage, grace, kindness, strength, humor, tolerance, understanding, charity, friendship, success, dreams, individuality, faith, hope, and imagination.
I printed this page out on heavy paper and ran it through the Xyron machine. Next, I used a circle punch (which miraculously happened to be the perfect size) to punch out the words and stick them on the tags. Using all kinds of glitter, stamps, and stamp ink, I decorated the individual tags. Then I tied them onto the fibers. I wrapped a piece of silver wire around the middle of the of the tags and twisted it closed, and I stuck the straight end of the wire and through a hole I made at the top of the altered board book’s spine. Then I twisted it closed and let the yarn and tags jangle and dangle over the side of the book. So much fun!!!

I was a bit nervous when I gave Danielle her altered book art. Would she like it? Would it be what she was hoping for? I was so excited to see her reaction, and she assured me that she loved it. What a wonderful reward.
If you like this altered book art, you might also like to take a look at my Altered Book ~ Heart-chitecture and also the Altered Board Book ~ Sea Dreams.