How to Make an Image Transfer

Image Transfer
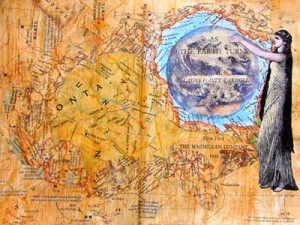
The earth image in the picture above is from my altered book, As the Earth Turns. It is made with an image transfer using clear contact paper. Notice how you can see the original book title and author’s name behind the image? That’s the beauty of an image transfer. It creates a transparent image for your art. This transfer method also works well with cold laminate and clear packing tape. If you have some clear contact shelf paper, give it a try.Ingredients
- clear contact paper or packing tape
- a color or black and white photocopy of the image or a magazine picture
Note: An image printed from your regular printer will not work with this method.
Process
- Cut a piece of contact paper a little larger than the size of your image.
- Remove the paper backing.
- Turn the contact paper, sticky side up, on your table.
- Place the image, good side down, onto the sticky surface of the contact paper.
- Flip the two pieces over. Use an old credit card, the back of a spoon, a bone folder, or some other stiff object to rub all over the contact paper so it completely connects with the surface of the image. I can tell when I’ve done a good job because I don’t see anymore light shadows on the contact paper.
- Let it sit for a few hours. I don’t have an exact time on this. The shortest time I let a transfer sit was about two hours. The idea is for the inks from the image to adhere to the sticky surface of the contact paper or packing tape.
- Drop the image into a bowl of lukewarm water. Let it sit in the water for a little while.
- Now you’re going to gently rub off the paper. At first the paper comes off pretty easily, just like taking the label off an old glass jar. But as some of the larger pieces peel away, you’ll get down to the smaller fibers that are a bit tougher to remove. Don’t get too anxious! If you try to rush, you might remove some of the image ink. (Not always a bad thing.) Be gentle, but persistent. Let running water flow over the image to help wash away the paper. Soon you’ll see a transparent picture to use in your art.
- Lay the transfer onto some paper towels and gently pat dry. Now you can use a clear drying adhesive to adhere the transfer to wherever you want to put it.
In the image transfer shown at the top of the page, I used a Q-tip dipped in water to wipe away some of the earth image so you could more easily see the book’s title and author.
Other ways to create image transfers are by using solvents, mediums, and more. If you want to try additional techniques, you might want to get Courtney Cerruti’s book Playing with Image Transfers: Exploring Creative Imagery for Use in Art, Mixed Media, and Design. Not only does she show you have to do the transfers, she also have project suggestions.
