Altered Book Project ~ Motor Girls

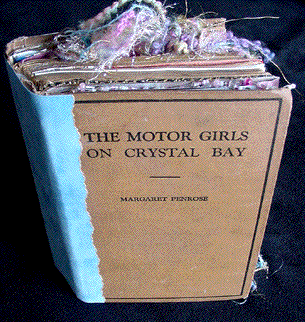
Altered Book Project ~ The Motor Girls on Crystal Bay
The Motor Girls on Crystal Bay was my first altered book project. Some people ask me how I got started making altered books. The first time I saw a picture of an altered book in a magazine, the art form immediately grabbed me, and I knew I had to do that.
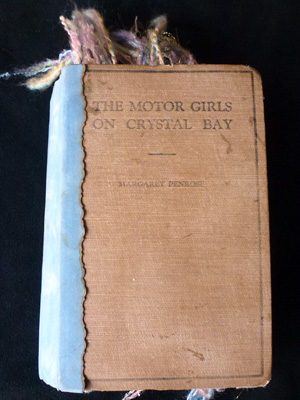
The idea of making an altered book was floating around in the back of mind for a while when I saw The Motor Girls on Crystal Bay tucked away on a dusty shelf at a junk shop. I realized that it would be perfect to alter. I basically learned how to make altered books as I created this one. Each time I finished a page, I wrote down my process, my successes, my failures, and reflections and posted them on my web site. It was a way for me to get feedback and encouragement and also a way of helping others learn how to make altered books for themselves.
Page 1 ~ Page 2 ~ Page 3 ~ Page 4 ~ Page 5 ~ Page 6 ~ Page 7 ~Page 8 ~ Page 9
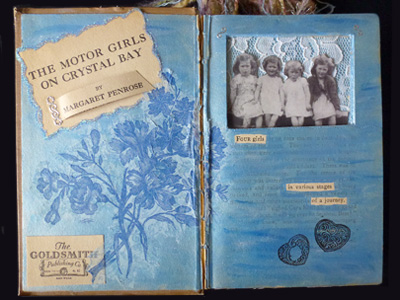
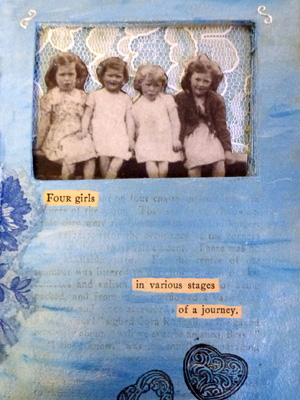
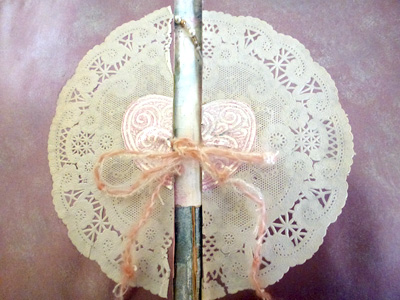
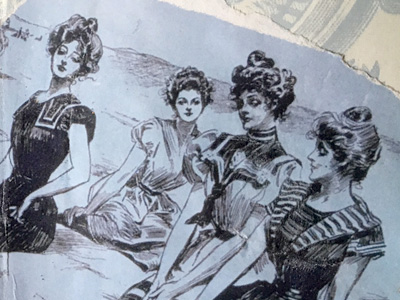
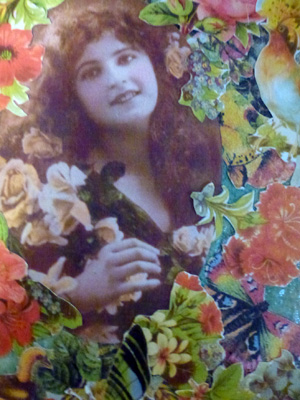
Page One ~ Title Page
Text
Four girls
in various stages
of a journey.
Ingredients
acrylics, lace, stickers, stamps, scanned image, tissue napkin, glitter
Lessons Learned
- Reinforce the tissue paper? But how? It’s tearing in the gutter.
- Put cloth tape down the gutter to smooth it out and reinforce it. Then maybe the tissue might not have torn?
- When I’m gluing only a few pages together, glue each page to the other instead of just 3 sides – not enough thickness to hold the glue/pages together.
- Should I spray the pages with some type of acrylic sealer to protect them?
Reflections
I’ve been thinking about what to do with the book ever since I bought it from a little old lady’s junk shop for $4 the day after Christmas. I’m on a message group with people that do altered books, so I’ve been getting lots of ideas from them. I didn’t even know what an altered book was a couple of months ago.
You can’t believe how hard it was to cut into the text to make that window! I mean, I almost started crying after I did it – the book is so old. I felt the way I did one time when I went to Cut ‘n’ Curl when I was in high school. I had long hair past my bra strap, and I just wanted a trim. I wanted the bottom sort of rounded, but the hair dresser took off about four inches! I almost started crying right there when I saw the reflection of my back in the mirror.
Isn’t it weird how I associated that memory with cutting up this book? I love books. I felt like I was injuring it in some way. Isn’t that strange? Maybe next time I won’t use a book that’s so old. But after all, how long do you think it would have sat on that bookshelf, unwanted, unnoticed, unloved? Anyhow, I’m happy with how it has turned out so far.
Suggestion from Others
And to answer your question about reinforcing the tissue at the gutter I think that at this point all you can do is to paint over the area with acrylic matte medium. Next time you might use a strip of lightweight cotton fabric adhered to the area with matte medium. Then glue your tissue in place. Thanks, Jo!
As far as spraying your pages. I’m sure we will hear from others. Generally, I don’t spray my pages. I am from the school of thought that says, “my art is for now. It isn’t meant to last forever.” Other’s are far more archival and would spray the pages. I don’t sell my books but if you lean towards selling your art then I suggest you look into the archival qualities of the sprays. Thanks, Linda!
Page Two ~ Crystal Bay
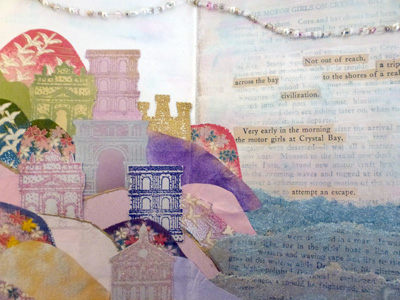
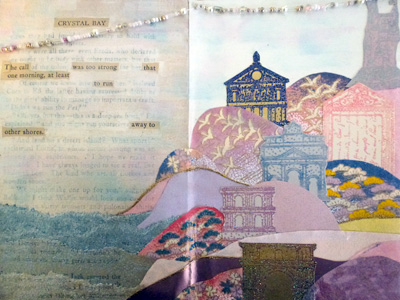
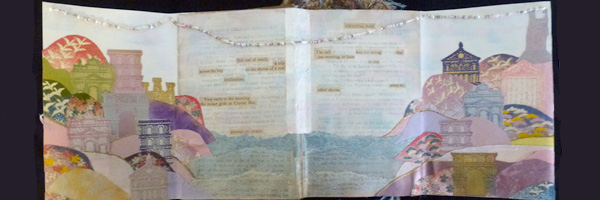
Text
Crystal Bay
Not out of reach,
a trip
across the bay
to the shores of a real
civilization.
Very early in the morning
the motor girls at Crystal Bay,
attempt an escape.
The call was too strong that
one morning, at least
to run
away to
other shores.
Ingredients
tissue paper, washi paper, cardstock, stamps, embossing powder, acrylics, ribbon, stickers. beads, doilies, silver tin
Lessons Learned
- Purposeful collage is not for the faint of heart!
- It may be better to get a slow-drying glue. While I love the feel of the the Perfect Paper Adhesive, it dried too fast for me. If I had to move something, it was very tough.
- Keep my fingers clean. It’s amazing how gray my fingertips got, and then I’d press down on that pretty light pink paper and – damn, a finger print! Looks like I’ll have to add another purple mountain. I started wiping off my finger tips with a diaper wipe. I also cut a tiny bit of wax paper and kept it handy to smooth down the papers after gluing.
- Be careful about using beads. When I was finished with the stringing, the book wouldn’t close. I had to rethink things and take some of the beads out. I also pulled some pages out and that made it work better.
- Be careful about glueing groups of pages together until I’m sure about what I’m going to be doing in the next section.
Reflections
Wow! This took me a lot longer than I imagined. I painted all around the text last night so that I could collage today, but I had no idea it would take me so long. I love the text on these two pages. There was something so romantic and mysterious about the way the words worked out. I knew in my mind right away that I wanted to have the Crystal Bay on this page, and I saw someone from the altered books group who had torn back layers of the book pages to give the layered look that I used for the bay.
The hills and castles came to me as I was looking for paper to use. I found this one 6 X 6 square of washi paper that looked like hills at sunrise with cranes sailing across the sky. Perfect! Then I imagined a place that would be a magical “civilization” that the girls would want to run away to. I was lucky that I had just the stamps I needed. But I knew I couldn’t get all the images I wanted on the page without covering up the text, so I decided on the fold out pages.
Getting the collage to come out just right was hard work but exhilarating – like putting together a puzzle and watching a picture appear.
It’s late. I’ve put wax paper between the pages to keep them from sticking together and weighted the book down to flatten it as much as possible. I feel very wired right now. Maybe it’s because I created something beautiful. Or maybe it’s just the caffeine from the Coke I drank at dinner. 1/2/02
Finally finished the front of the fold out part and the string of beads. I really wanted more texture on the page, so the beads helped to do that. I think they look pretty, but I almost had a heart attack when I saw how bulky the book had become. I had to remove some of the beads from the front section to make sure the book would close more cleanly. It’s still a bit lumpy, but not nearly as bad as it was.
I’m already thinking about the next page which is from the chapter called “Frights or Fancies.” It’s going to be very dark; I need something to contrast with the pastels I’ve used so far. I can’t wait to get started, but I think I’ll have to. Back to work on Monday and haven’t corrected a single paper that I brought home. Oh well… I wonder if there’s a twelve step program for artists?
Page Three ~ Frights or Fancies
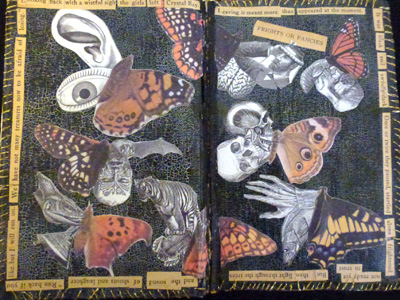
Text
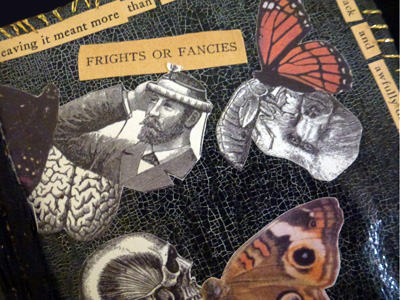
Frights or Fancies
Looking back with a wistful sigh
the girls left Crystal Bay.
Leaving it meant more
than appeared at the moment.
It was black
and awfully dark.
Once or twice they paused, startled
alone
frightened
not ready yet
to trust
But then
light through the trees
and the sound
of shouts and laughter
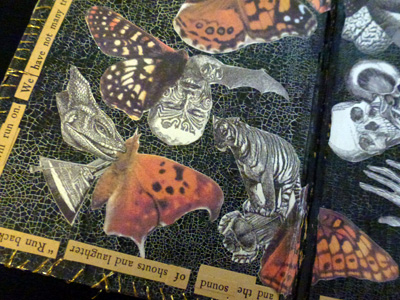
“Run back if you like, but I will run on.
We have not many treasures now to be afraid of losing.”
Ingredients
collage art graphics, magazine clippings, scanned photographs, color photocopies, acrylics, gold thread, crackling compound
Lessons Learned
I really want to learn more about how to manipulate graphics on a computer. When I scanned images and then resized them or adjusted their position, the pixels got tweaked and they lost focus.
Reflections
This page was in my mind for quite a while, and it really turned out the way I envisioned it. I wanted it to be dark, creepy, scary-the antithesis of the previous two pages.
The girls set out on their journey, but it’s a bit frightening for a while. They’re not sure of themselves. Then, of course, they come through into the light of the next page which is called “Too Much Joy.” Because the title of this chapter was “Frights or Fancies,” I wanted to juxtapose beauty with images that were just a little off kilter. I knew I wanted the butterflies to represent the “fancies” side of things, and I had an idea of what I wanted for the “frights.” But it wasn’t until I find a Dover book of collage images that it sort of crystallized for me.
It took me a long time getting the “frights” to look right on the computer. I originally scanned them and then rotated and resized so they would fit with the butterflies. Unfortunately, my experiences with manipulating digital images is limited, so trying to adjust the scans made them blurry and faded out. So I photocopied them instead, resizing them on the photocopy machine. Then I cut and pasted them with the butterfly images on a separate sheet of paper. I then had a color copy made and cut and glued them onto the page.
I used Anita’s Crackle as the background. That stuff is so fun to use, but very stinky. And it takes sooo long to dry. It took about 3 days of applying and drying until I was ready to glue down the butterflies. I was very impatient. I rubbed some Brilliance white ink into the cracks so it looks really cool, although it doesn’t show up well on this web page. If you click around on the butterflies on the picture above, you can see close-ups of the images.
It’s a very tricky thing gluing multiple book pages together because you kind of have to consider how the pages move when the book is open versus when it’s closed. The pages shift position. For example, this page cannot lie perfectly flat open. That’s okay to me, but it’s just something I never really considered when I started working.
I was visiting my mom and aunt this weekend and two of my sisters were there. I actually did all the gluing of the butterflies and text, as well as the sewing while we were sitting around the table talking. My youngest sister said that she could do without the skulls, but I love the way the eye sockets in the skulls mirror the circles on the butterfly wings. None of them had even heard of an altered book before, so it was fun to share what I’d done with them and get their reactions. I’m so lucky to have so much positive female energy around me. Each one of them is artistic in her own way, so I know that even though something I do may not be their taste or appeal to them, I know they’re going to support me because they love me.
Suggestions from Others
As far as manipulating graphics on your computer, here’s some tips:
- Always scan using the BEST resolution.
- Once your image is scanned, immediately save it in .tif format, as opposed to .jpg. this will make the file larger, and may make your graphic program run slower during manipulation, but it will PREVENT pixel loss. When you save a file as .jpg and then manipulate it, you will lose pixels. Once you are all done with manipulation, then do a “save as” .jpg This procedure also holds true for touching up your artwork scans before uploading to the web or email. but remember, always convert back to .jpg before uploading, otherwise your file will be HUGE!
- If you are working with a file that is already in .jpg format, do a ‘save as” .tif and then start manipulation and follow tip #2. Great advice! Thanks Mona!
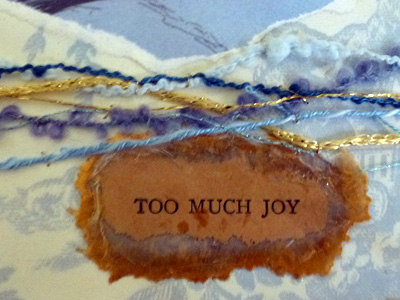
Page Four ~ Too Much Joy
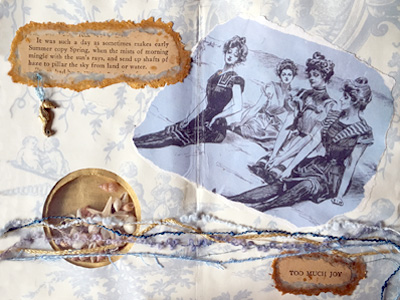
Text
Too Much Joy
It was such a day as sometimes makes early Summer copy Spring, when the mists of morning mingle with the sun’s rays, and send up shafts of haze to pillar the sky from land or water.
Ingredients
embossing tiles, PPA mixed with Aztec Gold Pearl-Ex, metallic threads, assorted fibers, color copy, sea shells, transparency, card stock, acrylics, and a sea horse charm
Lessons Learned
- Remember the lessons I’ve already learned!! Didn’t I say that the PPA dried very fast? Was it that long ago? I tried to use it to glue down the graphic of the girls and had dreadful results. That piece is about 5″x4″. By the time I finished covering one half, the other half had dried. It’s probably because I brushed it on thin. Next time I’ll spread it on more thickly with my finger. Maybe that will help.
- Don’t be afraid to try a new glue. I had some Golden Gel Medium that I had bought but never tried. It worked great when I finally used it.
- Do the gluing first – before the stitching or any really time intensive work. That way if I mess up the gluing, I won’t have to redo something I spent a lot of time working on already.
- Check how things are drying before they actually dry. I had glued the card stock to the book pages, closed the book and weighed it down, probably for the night. Something made me get up and look at the page. Thank goodness I did because a ripple had formed right down one of the girl’s faces. Fortunately, I was able to peel the graphic off (very slowly,carefully, and fortified by several epithets) and re-paste it down.
Reflections
I started planning this page in my brain before I had even started page 3. I found the graphic of the Gibson Girls while looking for a picture of a motor boat. I printed it out and thoughts about the image and how to use it were percolating in my mind for quite a while. I thought it would be perfect for the chapter “Too Much Joy.”
Don’t you love that chapter title? The text that I selected for this page is the single prettiest descriptive paragraph that I have been able to find in the novel. The book is written almost entirely with dialogue; there is very little actual description. I also think it’s kind of interesting that the author capitalized the words “Spring” and “Summer” in that passage. I teach 7th grade English, and I do a whole unit with them on capitalization. (Please, no email pointing out my typos and grammatical faux pas! 😉 ) One of the “rules” that I try to grind into them is not to capitalize the names of the seasons. Yet here’s a book from 1913 where they did just that! Isn’t it strange how language and grammar evolves?
This chapter is actually about having a picnic and all the wonderful food that the motor girls and their friends get to enjoy. But I love the idea of them spending a perfect day together on the beach, and so that’s how the shells came into the picture.
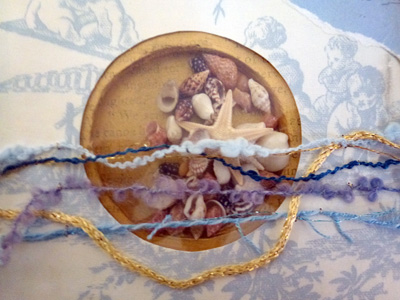
I’ve had these shells at the bottom of a drawer for quite a long time just waiting to be used. I had to use a big chunk of pages in order to cut a hole deep enough to hold them. I tried using an embossing tile to cover them, but it was too smokey-looking and made the shells difficult to see. So I used a piece of a transparency to cover up the hole and hold the shells inside. I think it turned out pretty neat.
The use of fibers at the bottom of the page was the last thing I thought of. I had bought a sampler of fancy yarns during the summer. I had never used fibers in artwork like this before, but the shades of blue I had were so perfect, and as I laid them across the page, they made me think of rippling water. But how to attach them to the page and still keep that free flowing look?
Well, I was looking over a copy of the magazine Quilting Arts that I hadn’t had time to read yet, and there was an article about a quilting/embroidery technique called “couching,” where you lay the fibers on the surface of the quilt and then stitch over them to hold them in place. So that’s the technique I used, only I sewed them onto the card stock before I glued it onto the book pages. The fibers are not sewn on the page real tight; in fact, you could probably pull them right out if you worked at it. But I don’t expect that the book will get any kind of rough treatment that would cause them to fall out. At least I hope it won’t!
The next chapter is called “Suspicion,” and I have no clue what I’m going to do with that. I may skip over it and go to the chapter called “Cora’s Brave Resolve.” Hmmm, I already have some ideas brewing for that one. . .
Page Five ~ Suspicion
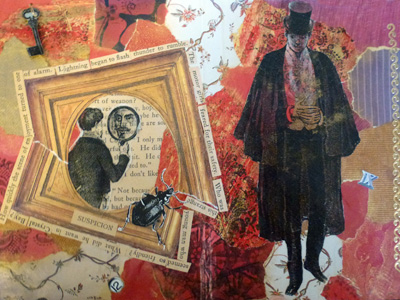
Text
Suspicion
How quickly the scene of enjoyment turned to one of alarm.
Lightning began to flash
thunder to rumble.
The motor girls feared for their safety.
Who was this strange young man who seemed so friendly?
What did he want in Crystal Bay?
Ingredients
magazine clippings, crystalline and other fancy papers, shrink plastic, stickers, acrylic transfer images, clip art, rubber stamps and ink, wire
Lessons Learned
- Instead of closing the book and then weighting it down to prevent the pages from buckling, I opened up the two pages spread them out flat, turned the book upside down and weighted it. (I use my pasta machine as a weight, by the way.) Came out so much better than previous times.
- As I add artwork to a page, there’s this sort of collateral effect on the pages I have already finished. For example, my frights and fancies page shrank! I could hardly open the pages up. I had to cut two butterflies that straddled the gutter of the double page spread so the book would open. This really surprised me. I think it may make more sense to work off the book for collage, especially when a lot of glue is used, and then glue the finished art into the book whenever possible.
Reflections
First off, making the crystalline papers was way too much fun. What I did was take white tissue paper left over from Christmas presents – just cheap stuff that I cut into fourths. I painted a layer of gloss gel medium on one side. Let it dry, and then painted another layer on the other side. I then used acrylic paints to play with color combinations and designs. The paint seemed to just glide over the acrylic. (I have a separate page where I show you how to make crystalline paper.) It was so much fun, I didn’t want to stop. I would spritz the paper with water to make the colors more transparent. Some of the color combos I used turned out rather yucky. The red and gold that I used on these pages turned out the best. I used torn pieces of this paper as part of the collage, along with magazine clippings and other fancy schmancy papers.
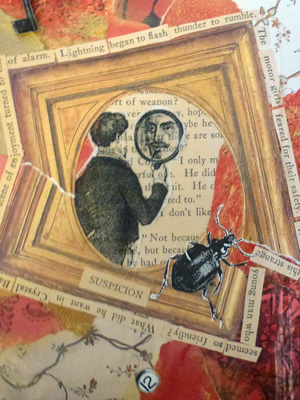
The two men are both done using an acrylic transfer technique, although I didn’t do it straight on to the collage. I ended up with two thin acrylic images that I glued down on the collage. I love the way the text is showing through the mirror that the man on the left is holding. And I like the way the colors show through the man on the right (although I would have been more conscious of how the patterns in the background affect the appearance of his face.)
I made the little key using shrink plastic. This was my first time stampin’ ‘n’ shrinkin’, and it was really fun, and something I’d like to try again.
This page was the most difficult one for me to design so far. I looked at the chapter title “Suspicion,” and knew I wanted to use it, but what would the motor girls be suspicious of in their lovely little bay? How about a man? The pieces of text I found just seemed to lend themselves to the idea of them being suspicious of a man who mysteriously appears.
I think it is so fascinating how you can start with just one little wisp of an idea . . . just a word or a color or one simple image . . . and then your brain just sort of brews up something that ends up surprising you. It’s so exciting when things just click.
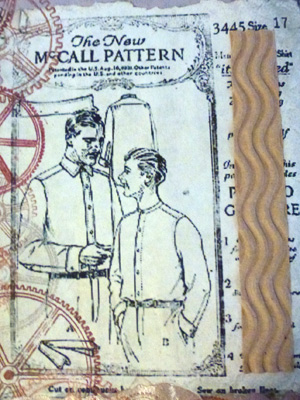
Page Six ~ The Breakdown
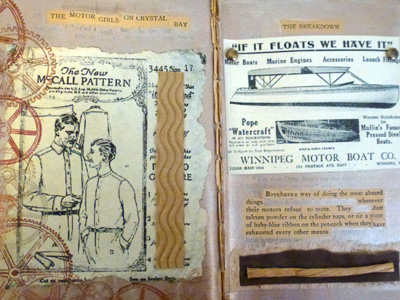
Text
The Breakdown
Boys have a way of doing the most absurd things
whenever their motors refuse to mote.
They dust talcum powder on the cylinder tops,
or tie a piece of baby-blue ribbon on the pet-cock
when they have exhausted every other means.
Ingredients
clip art, rubber stamps, torn paper, brads, acrylic paints, and raffia
Lessons Learned
- It’s a little nerve-racking to do rubber stamping as the last thing on a page. If I had messed up the stamping of the gears, I’m not sure what I would have done to recover.
- Glue pieces separately off the page to make sure they work right whenever possible, and then glue them down onto the book pages.
Reflections
I had been holding onto the old advertisement for the motor boat company for a long time, wondering how I was going to use it. I didn’t originally plan on including the chapter “The Breakdown,” but when I read the paragraph about what boys do when their “motors refuse to mote,” I just couldn’t help myself. I had to put it in. This seemed like the perfect opportunity to use the ad and make this a “male-ish” page with more neutral colors and images.
While I was at a used bookstore in town last week, I was perusing the shelves and suddenly a book with a familiar title caught my eye. There in front of me was a book called The Motor Girls by Margaret Penrose! I couldn’t believe it! Apparently, The Motor Girls on Crystal Bay is one in a series of books about the adventures of the motor girls who are originally shown driving what looks like a Model T. I finally got to see what the girls really look like thanks to two black and white plates inside the book. If you want to see the cover of that book and the photos of the girls, click here.
I went home and looked on the internet to see how much the books were worth. One of my big fears when I started altering this book was that I was ruining something valuable. What if my motor girls book was one of the only ones left on the planet, and it had been hiding undetected in this junk shop bookshelf? Turns out that’s not the case. There are a lot of motor girls books around. Maybe you’ll find one in your favorite used bookstore. Anyhow, I’m thinking that the next time I consider altering a book, I’ll check on bookfinder.com to see if the book is a priceless treasure that shouldn’t be tampered with.
Page Seven ~ Cora’s Brave Resolve
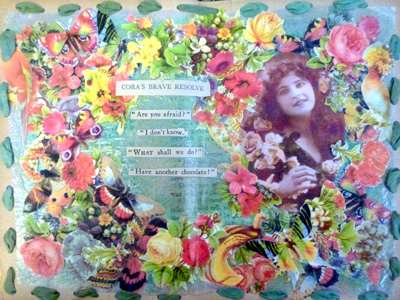
Text
Cora’s Brave Resolve
“Are you afraid?”
“I don’t know.”
“What shall we do?”
“Have another chocolate!”
Ingredients
Dover clip art, photo from collage sheet, silk embroidery ribbon, gold Krylon pen, crystalline paper
Lessons Learned
Don’t spend a lot of time making background paper look beautiful if you’re just going to cover it up!
Reflections
I had to spend a lot of time cutting flowers, butterflies, and birds for this collage, but I didn’t mind. I had such a busy week that I was too tired to do much more than mindless paper cutting anyhow. I used some plain crystalline paper I’d made and stamped over it with all the green shades of ink that I had and then proceeded to cover up the lovely colors with all the pictures. Actually, it probably wasn’t a waste of time to color the background paper. After all, some of it shows up behind the text and around the edges of the page. Plus, it was fun to do, so that alone makes it worthwhile.
I picked out the picture of Cora from a collage sheet I’d gotten from Artitude magazine. I didn’t want to use the original piece, so I scanned it and printed it out onto glossy photo paper.
When I was done with the collage, I punched holes around the edge, and used a tapestry needled to sew the silk embroidery ribbon around the pages. I love the ribbon. It’s so soft and easy to work with. I like the way it turned out. I think next time I’ll try threading some beads onto it as I’m sewing. That could look really cool, too.
Since I started altering the book, I’ve used the chapter titles to inspire the artwork that I do. The title of the book was what originally got me to pull it down off the shelf. When I looked inside and saw all the intriguing chapter titles, they just seemed to spark some creative impulses in me. I would look through the pages of the chapters I was drawn to and try to find a theme or idea I could interpret through collage. However, on the previous pages I prepared the text before I started the artwork. Sometimes the text has been a chunk of a paragraph I found on a page. Other times I’ve cut out interesting words and phrases and pieced them together to create something new. A couple of times I masked out other words on the page and just left interesting bits and pieces intact to create the poem. With this chapter, I knew I had to include it because I loved the title so much. And I knew immediately what I wanted to do with the art. But I didn’t have a clue about what I was going to say with the words.
All of the collage was done and the clip art and photo were glued onto the crystalline paper. The edges were trimmed with gold and the silken ribbon sewed in place. And there in the middle was the blank space where I would put . . . what? I looked at all the pages that I had pulled out from the chapter. Over and over again I stared at those pages looking for a theme, something that would relate to “Cora’s Brave Resolve.” Days passed. I kept coming back to the words and searching. Still nothing. Finally, I started chopping out sentences that caught my attention and just laid them out on the table. I had six chunks of sentences in front of me, and then I saw it. Suddenly I knew what Cora’s resolve would be. She would deal with her problems the same way I tend to do – by resorting to chocolate. I can’t think of a better resolution! Can’t you just relate???
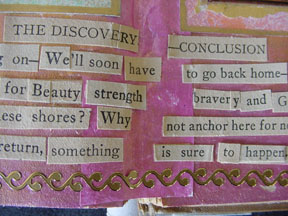
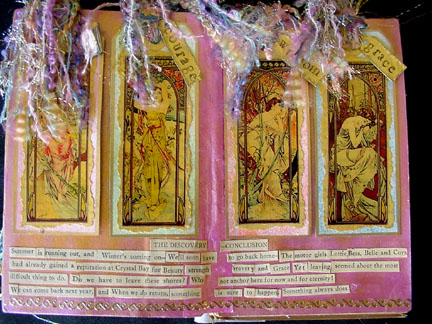
Page Eight ~ The Discovery – Conclusion
Text
The Discovery – Conclusion
Summer is running out, and Winter’s coming on-
We’ll soon have to go back home-
The motor girls, Lottie, Bess, Belle, and Cora
had already gained a reputation for Beauty strength bravery and Grace.
Yet leaving seemed about the most difficult thing to do.
Do we have to leave these shores?
Why not anchor here for now and for eternity!
We can come back next year,
and When we do return,
-something is sure to happen.
Something always does.
Ingredients
Invent-It! Body Sticker Tattoos, card stock tags, gold metal foil, embossing powder, acrylics, PearlEx powder, stickers, assorted fibers, alphabet stamps, Krylon gold leafing pen, Brilliance ink, graphic images from Alphonse Mucha prints
Lessons Learned
- Sometimes things don’t work out the way you plan, but sometimes that makes them better.
- Don’t rush; if the idea doesn’t leap out at you, take your time and think, think, think.
- Staring at something without doing anything can yield positive results – it’s okay to do nothing but reflect.
- Don’t decorate the end pages until the end of the book.
Reflections
Here’s how I did these two pages. I got these images of the Alphonse Mucha prints several weeks ago off the internet by doing a search for vintage women. I knew they’d be perfect for the book, but I wasn’t exactly sure how. (That does seem to be a common thread throughout this process. Find something intriguing and then figure out how to use it.) I heard about this stuff called Invent-It! Body Sticker Tattoos that you can use with an ink jet printer. I had originally discovered it while working with polymer clay, but thought it would be a cool way to do image transfers. So I made the Mucha images into body tattoos.
I painted the book pages with Lumiere pearl magenta acrylic and then brushed Aztec gold PearlEx all over the page while the paint was still slightly damp. I took some book pages that I had torn out of the book, painted them with gold acrylic and transferred the body tattoos onto those book pages. I used some decorative trim scissors and cut a border around the images.
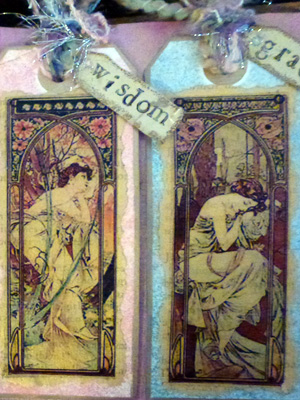
I took some white card tags and trimmed them so they’d fit across the book pages. I colored the tags by stamping directly on them with different shades of Brilliance ink. I glued the tattooed book pages onto the tags. Then I put a gold border around each tag with the Krylon pen.
I cut little gold metal tags out of the foil and using my alphabet stamps, stamped the words on them. I then used gold embossing powder around the edges. I put the art fibers through the large tags, attached the tiny gold tags and then used double sided poster tape to adhere them into the book.
The pretty gold border sticker at the bottom of the page was used to cover a mess-up I made with the text. I had glued on one additional phrase of text, but decided I didn’t like it. So I used a wet sponge brush, carefully soaked the sections I didn’t like with water, and used an Exacto blade to gently scrape up the text. It didn’t look too bad, but I thought the stickers would look nice there anyhow so decided to use them.
I had a lot of indecision on this page. After I had made the women tags, I wasn’t really happy with the colors I’d chosen for the backgrounds. I’m not much for the pink and green combo. By using the Krylon pen along the border of the tag, it took away some of that color, softening its effect.
Also, I could not decide on the best way to finish the text. The words seem important right now because I’m so close to the end of the book, and really this is the last chapter of the book, although it’s not the last page I’m doing.
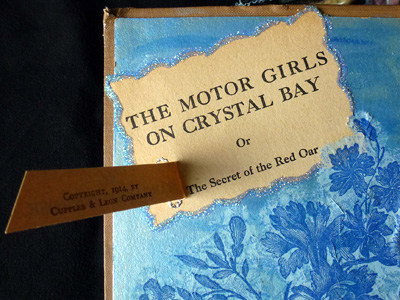
The book is really overstuffed right now, and I still have one more page to go. The back cover is completely separated from the pages of the book and is just holding on by the cloth along the spine. I’m going to have to cut the cloth, split the spin of the book, widen it and reconstruct it. A pretty daunting task. If I could I would just remove the entire cover and rebind the book with a new cover. But I decorated the title page right on the inside of the front cover, so I can’t remove it without destroying the title page, and that just won’t do.
As I get close to finishing the book, I’m finding my pace slowing down. Even though I know what my last page is going to be, I’m dragging my heels a bit. I really don’t want to be finished with the book because I’ve grown very fond of the motor girls; I guess I don’t want to have them go. Why can’t I just anchor with them here for now and eternity?
Page Nine ~ We Will Take Leave
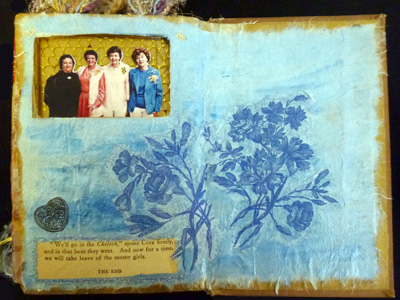
Text
“We’ll go in the Chelton,” spoke Cora firmly,
and in that boat they went. And now for a time,
we will take leave of the motor girls.
The End
Ingredients
photograph of my mother and her three sisters, metallic ribbon, cocktail napkin, rice paper, gold acrylic paint, rubber stamp, black ink, velvet/suede paper, gold Krylon pen
Lessons Learned
- I think it might take hours to tell you! Let me put it this way, whatever you do, don’t use the end papers as an integrated part of the book, because once you do, you’ll have real problems if you have to rebind the book in any way.
- Remember that what you do on one page can have negative consequences for the other pages. Always go back and make sure every previous page is still “working” as you progress through the book.
Reflections
This is going to be a little long. Are you ready? Let’s start with the technical stuff first. Finishing this book has been a real challenge! Things got really messed things up at the end. Here’s what happened…
As you know, the book was getting so fat with beads and fibers and brads and things, that it would no longer close all the way. Perhaps I should have just lived with that, but I thought I could “fix” it. Of course, my plan would have worked a lot better if I hadn’t decorated the end paper that is glued to the front inside book cover. Then I could have removed the cover easily, reinforced the spine, and replaced the cover. But I’m a beginner after all, and I didn’t know any better.
So what I did was cut the cover of the spine lengthways down the middle. I decorated my last page by doing essentially the same things I did on page 1. I glued quite a few pages together, leaving the bottom page free, and cut a window. On that free bottom page I painted with gold, glued down that holey metallic ribbon and then the picture on top of it. Then I glued the thick section with the window cut out on top of that.
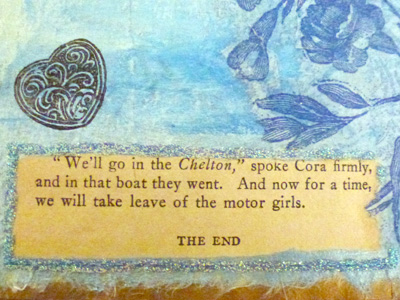
Trouble was, the last page of the book was totally ripping away from the other pages. I used some Tyvec from a USPS priority mail envelope to reinforce the gutter. Then I painted over the double page spread with gold acrylic. Next I glued some strong rice paper (mulberry, I think) across the two pages. After that I painted over the rice paper with some more acrylics. I added the napkin flower, the text and the stamp, and was finished with the inside.
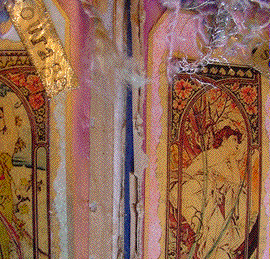
Now for the cover. I would say that the book is almost twice as thick as it was when I started- and I pulled pages out! I had a half inch gap along the spine. I reinforced the spine with a strip of cheesecloth. Then I cut a strip of suede paper with decorative scissor. I used my Krylon pen to gilt the edge and I wrapped the suede paper from the front of the book to the back along the spine. Here’s a close-up:
I thought it turned out okay. I know that some people do incredibly beautiful jobs decorating their book’s cover, but I decided to keep the homely tan cover as the last connection to the original book. I also like the idea of someone feeling surprised when they open the plain cover expecting something old and yellowing inside and instead find all the colors and textures. I guess it reinforces the old adage, “You can’t judge a book by its cover.”
Then tragedy struck. I opened up page 8 and my beautiful double page spread ripped right down the middle.
Apparently I didn’t do something right when I was futzing with the spine/cover combo.The entire double page spread split right down the middle. Not only was there a gaping crevasse down the center, some of the text at the bottom of the page ripped mid-word! I had no clue how I was going to repair this. I wasn’t even sure that I could camouflage this mistake. Gold ribbon maybe? Or wrapped wire? The funny thing is, I wasn’t too heartbroken about these sad looking pages because it became another lesson learned. I had a new challenge – how the heck to fix the split. Here’s what I did:
- Gently removed the front piece of suede paper I had used to repair the outside spine.
- Carefully pried up the text and tag art from along the inside gutter of the book.
- Cut a piece of Tyvek from an envelope and painted it the same color as the page background.
- Reglued the section of right hand pages that had fallen off.
- Reinforced the outside spine again with cheesecloth.
- Glued the painted Tyvek along the inside gutter, tucking it under text and tag art.
- Reglued text and replaced text that had been destroyed (thank goodness I still had a few pages of the book in reserve!)
- Got ticked off because the Tyvek didn’t line up perfectly at the top and bottom. (sloppy!)
- Got happy because it dried and looks pretty good, considering!
Some Final Thoughts
I wanted this last page to be a mirror of the title page. I showed my sister the title page when I started two months ago, and she asked me, “Is that us?” She was referring to the picture of the four little girls. You see, I am the eldest of three sisters, so she thought maybe the book would be about the four of us. But that was just a coincidence. I didn’t know how many girls were in the story when I bought the book; I only found out later. So I told my sister that the picture was not of “us,” but just a picture I found.
Then she asked me, “Is the photo supposed to represent mom and her sisters?” No, I hadn’t even thought about that either. When I started working on the book I had no plan, no idea what I was doing or where I was going with it. Sometimes, while I was working on one page, an idea for the next one would pop into my mind, but that was about it as far as planning goes. Still, I think there was some kind of cosmic design going on with the Motor Girls. I have three sisters. My mom has three sisters. The book was about the adventures of Cora and her three friends. Isn’t it amazing that I happened to pick this off the shelf for my first altered book?
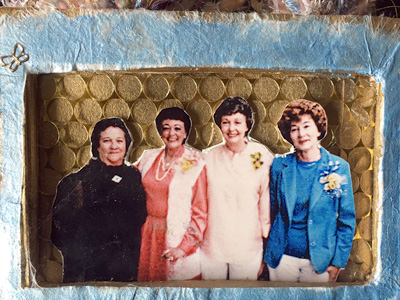 My aunts Betty, Louise, Novelle, and my mom, Sandie
When I got to the end, I decided that I would use a picture of my mom, (she’s the one in blue on the right) and her sisters. Sadly, they are gone now. They lived their lives just like I imagine the Motor Girls did– full of courage, wisdom, grace, humor, and strength; each one living a life filled with personal journeys and adventures. And that’s what I want my life to be like too. In fact, I think there’s a little bit of the Motor Girls in all of us.
Thank you one and all for sharing this incredibly rewarding artistic process with me. Your advice, praise, and enthusiasm are worth more than words can say. Even though my first altered book is done, I hope there will be many more in my future. And I look forward to sharing them with you.