Found Object Assemblage ~ The Gift

Found Object Assemblage ~ The Gift
My mother taught me to appreciate and examine nature. From a very young age I remember her naming the trees, flowers, and birds that gathered and grew in her well-tended garden. The picture of her crouched over among the irises, digging for and dividing the bulbs, laying them out in neat rows along the lawn, is as clear today as it was over thirty years ago. She taught me to treasure each squirming earthworm, to marvel at the delicate intricacies of a spider’s web, and to appreciate the unexpected family of quail that paraded through our backyard. Wherever we went, she never stopped teaching me about the natural world and the beauty that surrounds us. So it was with a mixture of joy and sadness that I created this found object assemblage. My mother had Alzheimer’s, and even though at the time I was working on this piece her disease had not yet progressed into the severe stage, little changes in her personality reminded me that I was losing her bit by bit.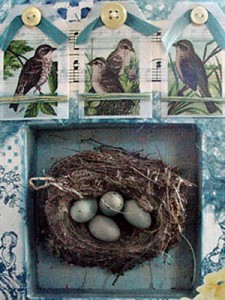
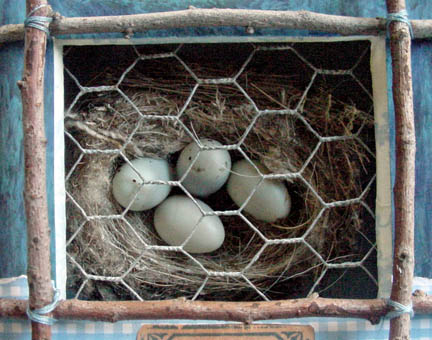
The day she destroyed a nest of eggs that a house sparrow had built on her porch was a particularly low point for me. This act was the total antithesis of everything my mother stood for. A few years earlier, she would have sooner cut off her right arm than harm that little bird’s home, no matter where it had been built. And the nest would not have been a “filthy mess” behind the metal boat sculpture, but something to marvel at.
She pulled out the nest, not noticing the eggs that rolled out and hid themselves. Of course, the mother bird never came back after that. But I saved the little blue gems, and later found the nest too, keeping them for the day when I’d be ready to use them in my art.
Those memories, these days together, this nest and the eggs, each one is a gift.
My mom passed away on May 22, 2006. The next day, I gave this book to my dad.
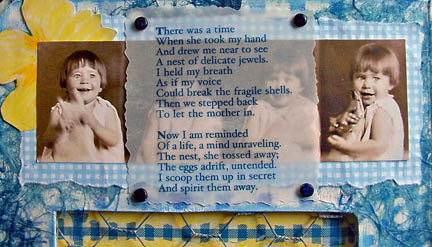
The Gift
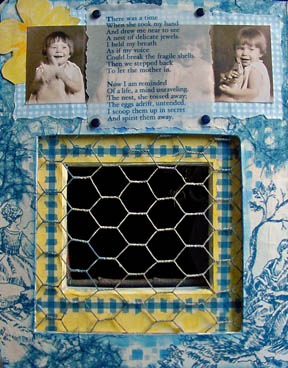
There was a time
When she took my hand
And drew me near to see
A nest of delicate jewels.
I held my breath
As if my voice
Could break the fragile shells.
Then we stepped back
To let the mother in.
Now I am reminded
of a life, a mind unraveling.
The nest, she tossed away;
The eggs adrift, untended.
I scoop them up in secret
And spirit them away.
Preparing the Book
This found object assemblage was created using a very fat children’s board book that I got at Half Price books for a few bucks. The fact that it was so thick and that it had a window in the lower half of the cover made it perfect for this altered book project.
I went through my usual preparations for altering a board book. I sanded the pages that I knew I would be working on and put down two coats of gesso to cover up the original text and illustrations. I used my monster exacto to cut down about an inch into the book to make a niche for the nest and eggs. Then I glued that block of pages together. I don’t glue the top page until the very end. That makes it easier for me to work on and to wrap papers around to the back side of it.
The Left Side
The first thing that I did on the left side was to paint the little frame yellow. I made a border using strips of gingham blue printed tissue paper which I glued around the frame. I taped a piece of quail wire (which has smaller openings than chicken wire) between a sandwich of two pages and glued the pages together. Then I decorated the double page spread using printed tissue paper and dyed Japanese paper which has a rough, loose weave. I used various shades of blue ink pads and a square stencil to print a check pattern around the empty white spaces to tie everything together.
I had a scrap of wallpaper border with yellow and blue flowers on it. I scanned and printed the image and then colored in the yellow flowers to match the color in the yellow frame. I layered a piece of blue checked paper, the first yellow flower, a strip of pictures of my mother from when she was a little girl and glued them in place. The poem was printed on white vellum and is held in place by four tiny brads which I painted blue.
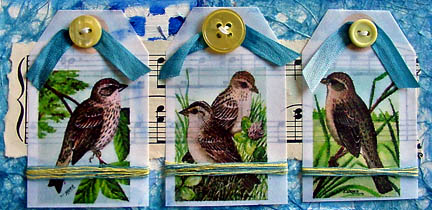
The Right Side
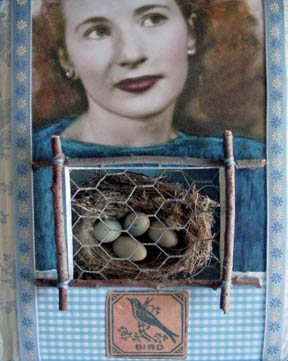
At the bottom of the niche, I glued some light blue paper and also put a strip of it around the sides of the opening. I glued another group of flowers in the right bottom corner. The bird images were scanned and printed on white vellum tags. I glued the blue ribbons and yellow buttons on top. Around the bottom of each tag I wrapped yellow and blue thread. I glued a piece of sheet music onto the book, and then glued the bird stickers on top of that. I don’t think I centered the sheet music on the page very well, but there is nothing I can do about that now.
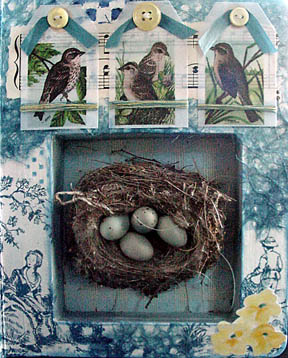
The nest and eggs were glued into place after I had completed the cover and finished every other part of the book. The nest and eggs are extremely fragile. I sprayed the nest with matte fixative, hoping to keep it from unraveling, but little flecks of it continue to fall off. I had seven eggs when I started, but broke three while making the book. I suppose that was fate, since four eggs in the nest makes perfect sense– one for each of my mother’s daughters– me and my three sisters.
The Cover
The first thing I did for the cover was prepare the photo of my mother. It was originally black and white, but I scanned it and added the warm sepia tones. I had to play around with the image for quite a while in order to get it the right size for placement on the cover. I wanted the bird nest opening to be at about chest level. I must have printed out a dozen test prints before I got one that fit just right. After I had printed out the final copy, I used a combination of chalk and oil pastels to add color to my mother’s face, hair, and dress.
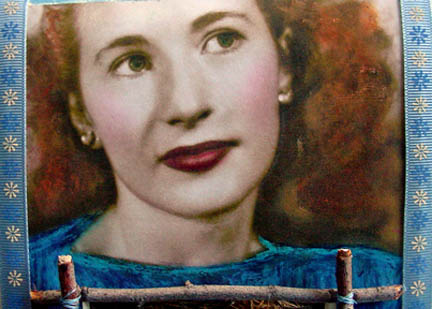
When the picture was ready, I wrapped the entire front and back covers with the light blue printed tissue paper. I start on the front and put fluid matte medium all over the cover. Then I lay the tissue paper on top and smooth it out, brushing matte medium over the surface and smoothing it down with my paintbrush. I don’t worry about wrinkles; in fact, I encourage them. After the top is dry, I continue gluing and smoothing the tissue paper around the spine, and after that dries I finish with the back. I have found it easier to lay down the cover paper this way; I get much better results than if I try to wrap the whole book at one time. When the entire book is dry, that’s when I fold the edges back and glue them to the undersides of the cover.
With that part finished, I adhered my mother’s photo in place, using a Xyron machine to apply the adhesive. I was worried about the picture warping or wrinkling and sometimes, when I have a piece this large, the matte medium dries on one end before I can position it. I didn’t want to risk any mess-ups with this picture. I put the image through the Xyron machine and then peeled off just a half inch of the backing paper at the top end. When I was absolutely sure that I had the picture in the proper place, I peeled off the rest of the backing and smoothed the image down using a dried baby wipe. I followed the same process for the gingham paper at the bottom.
I had some nasty looking edges along the sides of the paper, so I put sticky red tape on some decorative ribbon and ran that along both sides of the picture, wrapping it to the backside of the cover at the top and bottom. I made a frame with twigs, glueing them together and wrapping the cross-sections with blue thread. I used the gel medium to attach them to the book, and finally I glued down the bird block picture.
Finishing Touches
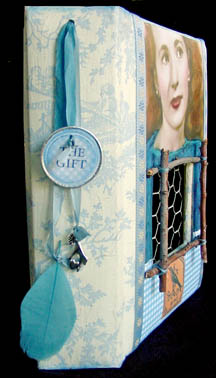
Using a small blue stamp pad, I made a smudge of color around the inside and outside edges of the book.
I punched a hole in the top of the spine and pushed through the three ribbons, knotting them behind the spine so they wouldn’t come out. One ribbon has a charm, one has a feather, and the other has a tag with the title of the book on one side and my signature and date on the other.
Many of my altered books are really found object assemblages using the book at a substrate. Maybe all those other books were preparing me for this special one.
You can find other found object assemblage that I’ve made from board books by visiting Day of the Dead and Sea of Dreams.