Altered Book Tutorial ~ Astronomer’s Apothecary

Altered Book Tutorial ~ The Astronomer’s Apothecary
I originally created this altered book because I wanted to win a contest for ArtChix Studio. The challenge was to use the lovely young lady swinging from the moon, so how could I resist an astral theme? I won the contest, which was very exciting because so many talented people had entered their own altered books. Later on, I thought it was great book to use for an altered book tutorial. So here it is!Several years later my aunt Ulla fell in love with the book while she was visiting us, so I gave it to her. Her husband, my uncle Dr. Stanley Mohler, was a well known aerospace physician and educator, so I think she felt a connection to the starry theme because of that.
Getting Started
This piece started out as a tall children’s board book that I got at a library book sale. Because of all the niches and layering of pages, careful planning is a must. I really spent a lot of time just staring at the pages, trying to figure out where things were going, how deep I’d have to cut, and so on, because once I start cutting through the pages, I’ve really made a commitment. (Of course, if things go awry, I can always toss the book and start again–right?)
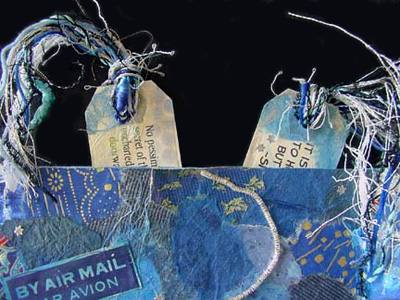
I used a scrapbook template to lay out the rectangles on the right page and the niche on the left. I used a craft mat under each page as I cut through it with an Exacto blade. I tried to use the little Exacto that I usually use, but the blade was too dull. My husband came to the rescue with an industrial strength Exacto that has about twenty-five blades stored inside of it. Wow, what a difference it made using this versus my little craft knife! In addition to making the window and niche you see on top, I also made slots on the sides of the book in which to insert small tags with star related quotations.
Painting and Collaging
Once all the cutting was done, I painted over the spread with Lumiere’s acrylic paint. I mixed pearl blue with super sparkle and pearl white. I have to tell you that I covered most of the book with tissue paper and acrylic medium first, because at that time, I wasn’t sure what I was going to do for the background. I had been thinking about just painting it. I didn’t sand or gesso this time, but the tissue and medium definitely gave this slick board book some “tooth” for the additional papers to grab on to.
I decided to go with a torn paper collage for the background, so I went through all my papers and found everything that was some shade of blue, silver or pearly white. I used washi paper, magazine pages, old maps, stamps, wall paper, napkins, and tissue paper and tore them into small pieces and laid them in piles around my table. When my little piles were ready, I started gluing the paper pieces down, going from white/light blue at the bottom of the page, to dark dark blue at the top. As I applied the papers, I wrapped them around any book edges and glued them underneath.
When the paper was dry, I went over some places with shades of blue F & W acrylic inks to unify the papers and make them blend together a little better. I used artist Leslie Riley’s method of image transfer using an ink jet transparency to get the image of the globes and trajectory lines onto the paper. And I also stamped some circle and square patterns using different shades of blue ink pads. After that, I stuck some tiny star stickers here and there across the page.
The Right Side

On the right side I cut out the picture of the girl and glued it on top of some silver flecked black paper. Then I glued this piece under the window opening. I used Class A Peels stickers to create a border around the picture. I used a piece of toile wrapped with blue wire and star beads to make a curtain around the window. I also split a Parcheesi game piece and glued it below the picture along with the blue and silver stars.

The Left Side
I used silver tissue paper to wrap around the inside edges of the niche. I used a piece of the book that I had removed to make the little shelf for the bottles. I also covered this with silver tissue paper. The bottles are filled with different art stuff and glued onto the shelf with gel medium. That beautiful silver thread spilling out of the bottle is actually kinked metal wire. I think it might be called sadi thread. I also used gel medium to glue down the blue game pieces, the stars, and the stamp, and that lovely blue starred ribbon at the bottom of the page.

I have to mention and thank the members of the Altered Book Artists Yahoo Groups embellishment swap for sending me some gorgeous items which I used in this altered book. Two of the bottles, the blue game pieces, the silver sadi thread, the manilla tags, and some of the paper I used in the collage, all came from that swap. So thank you ladies, wherever you are, for helping to make this altered book and this altered book tutorial!

The Covers
Once these pages were decorated, I worked on the front and back covers. I tore some black and silver marbled paper into pieces and glued them all around the front and back of the book, again making sure to wrap the papers around the edges of the pages. When dry, I glued all the board book pages together with gel medium. The black is much blacker and the silver is much more silvery than this picture shows.
Next, I wrote the title with a silver Krylon leafing pen on a mica tile. I put glitter around the edges and attached it to the cover using gel medium. I also rubbed a few stars around the front.


The Tags
Finally, I decorated the little tags. I printed out my quotes from the computer onto fake parchment paper, glued them onto the tags, and then decorated them with stamps, glitter, paint, and paper. I also added some fibers at the top of each tag.
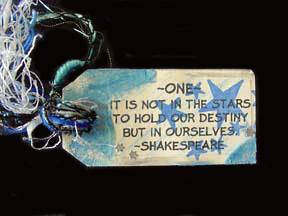 It is not in the stars to hold our destiny but in ourselves.
~Shakespeare
No pessimist ever discovered the secret of the stars,
or sailed to an uncharted land,
or opened a new doorway for the human spirit.
~Helen Keller
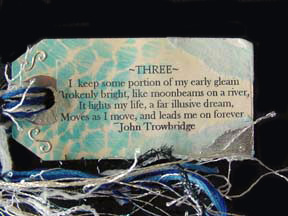 I keep some portion of my early gleam
Brokenly bright, like moonbeams on a river,
It lights my life, a far illusive dream,
Moves as I move, and leads me on forever.
~John Trowbridge
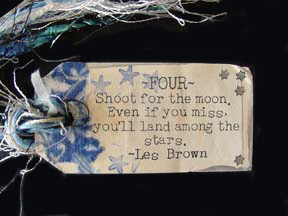 Shoot for the moon. Even if you miss, you’ll land among the stars.
~Les Brown
Be glad of life
because it gives you a chance to love and to work and to play
and to look up at stars.
~ Henry Van Dyke

This book was so much fun to make, and the colors still look scrumptious to me. if you enjoyed this altered book tutorial, you might also like Altered Book Art ~ 18 Wishes.