Making Altered Books ~ A Child’s Art

Making Altered Books ~ Art in a Child’s Hand
Art in a Child’s Hand was one of the first board books I ever made–way back in 2002. There are a few things I would do differently as I look at it now, but I do like the sentiment it captures, which in essence says that things don’t have to be “perfect” to be enjoyed.
The first thing I had to do was find a book that was 5″ x 5″ or smaller, so I went to my favorite used book store. I walked around the store twice, scanning the shelves for a little book. I couldn’t even find a board book at first. I was almost ready to give up (after having nabbed a few other gems) but decided to go back to the kids’ section one more time. There, on the bottom shelf, buried underneath some other books was a miniature copy of Time for Bed. Perfect! Children’s board books are great for making altered books, especially for those just starting out with the art form, because they are small, sturdy, and have only a few pages to design on.
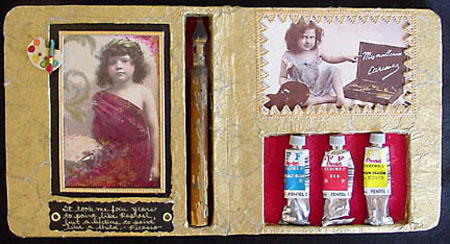 It took me four years to paint like Raphael,
but a lifetime to paint like a child.
~Picasso
When I started working on this book, I decided to do a layout on an old file folder first so that I could get the measurements as precise as possible before I started cutting in the actual book. I traced around the edge of the book onto the folder and cut it out. Then I put all the elements I had been collecting for this project on the table in front of me and started playing with them on my template, trying to find a nice layout. Making altered books this small is not as easy as it might seem. You have to use fewer materials and be careful about spacing of elements.
Once I knew where I wanted things, I had to decide how deep I was going to cut into the book. I knew this was just going to be a single double-page spread, so I didn’t have to worry about what was going to be on the other pages. But I had to decide how deep I was going to cut for the ink pen, for example. Did I want it sitting in a niche flush with the page or sitting on top of the page? Did I want a matte effect around the picture? Did I want one matte or two . . . and so on.

I lightly sanded all the book pages to give them a little “tooth” so any paint or adhesive I used would adhere better. I use an overhead transparency pen to mark out my measurements. This is a great tool to use when making altered books. They are great for marking things on transparencies or glossy surfaces because you can wipe the marks away with water or a baby wipe if you mess up or after you’re done. I use the transparency pen all the time to mark glass, plastic, and other slick surfaces.
Once I had the pages marked, I placed my self-healing mat underneath the page I was cutting and on top of the pages I didn’t want cut. I used a 6″ steel ruler as a straight edge and dragged my Exacto knife down the page alongside the ruler to cut through the board book pages. It took me four to six passes with the Exacto on each cut in order to get through a page. By the time I was finished cutting, my hand and arm were very tired. That is not an easy job.
Next, I had to figure out what I was going to place behind the elements as backgrounds in the niches. I found some scraps of fabric that coordinated with the colors in the girl’s dress- red floral satin behind the paint tubes and burgundy velvet behind the pen. I painted a black border around the edge of one cut-out to frame the picture on the left.

After that, I started tearing some gold leathery paper that I had. I glued the paper all over the window edges, making sure to wrap it around the window openings and onto the insides of the book. This was a very tedious process, but kind of relaxing at the same time. I used matte medium as my adhesive. However, I mostly use the thicker gel medium when making altered books to glue the pages together. I then placed the collage pictures in their little boxes and continued gluing the gold paper all over the book.
I used gold art papers to frame both the pictures. In order to adhere the pen, I used 5 minute epoxy after sanding the underside as flat as I could. I also used epoxy to attach the little painter palette button in the top left corner. The flourishes you see inside the vertical picture were made by gluing a paper napkin over the collage picture. It melts into the lighter colored background, but I didn’t like the white shadow it left behind on the burgundy colors of the girl’s dress, so I painted over parts of it.


I had some old dried up watercolor tubes that I had been dying to use in a book, and this seemed like the perfect opportunity. I used matte gel medium to glue them in place.
Last but not least, I added the quote at the bottom of the left page. I had a scrap of black card stock that I cut with deckle scissors. I must have practiced writing the quote about a dozen times until I had the spacing and lettering just right. Even with all the practice, I still messed-up twice before the writing came out okay. I used my Dremel tool to drill the holes for the eyelets and gel medium to glue the paper and the eyelets in place.


The front and back covers are completely unfinished. I decided to leave them that way to help people understand more about the process of making altered books.
I like giving myself an “assignment” with a certain theme in order to enter a contest or get published in some way. It’s a way to give myself a concrete goal to work towards, and I stretch a bit because I try new things.
If you are interested in more information about making altered books, please take a look at my Altered Board Book ~ Sea Dreams or the Book Art ~ Heart-chitecture.